Friday, May 30, 2014

Goodbye Mama Elephant!

Yesterday was my last official Mama Elephant DT post.  No drama or crisis behind this decision, just a matter of not enough hours in the day!  I'm not as young as I used to be, heehee!

I have enjoyed every single moment of my time on the Mama Elephant team:)  Kryssi and Angela are amazing and I can't thank them enough for everything!  They took a chance on me and I'll be forever thankful:)  As for my ME teamies past and present, I couldn't be prouder to be a part of such a fantastic group of people!  Not only are they super talented, but sweet and fun to boot!      

Here's one of my favorite ME cards and it pretty much sums it up!


Mahalo and Aloha,
jj

Thursday, May 29, 2014

Guesting on the Mama Elephant Blog

I'm guesting over on the Mama Elephant blog today!  I'm sharing a this card I made with the new Sweet Havana set.  Go check it out!  


Mahalo and Aloha,
jj

Colorful Storybook Critters with Avery Elle

Happy almost Friday;)  It's time for me to share 2 cards that I made with the Avery Elle Storybook set!  This set (which has coordinating dies) is full of sweet animals with a little bit of vintage feel.  Super cute!  

For my first card, I paired the stamps with dies and stamps from the Weather It set.  Like they say, water off a duck's back, right?  I stamped my brace of ducks (with a little masking) and gave them some reverse die cut clouds.  I made a custom cloud that was big enough to fit my sentiment by cutting the two small cloud dies multiple times.  I hope this card brings a little comfort to someone:)


My second card is a bit of an experiment.  Oftentimes, my experiments end up in the trash can, but I really like how this turned out!  When I was making it, I was thinking of the Velveteen Rabbit.  I started off my blending a rectangle onto the card base with Distress Inks (I masked off the rectangle).  Then I used my watercolors to paint a rainbow over the rectangle.  Above the rainbow, I sprinkled a bit of plain water.  I also painted the edges of the rectangle with some plain water to soften them up.  


Here's a little closer look at the coloring.  I'm sure there are real artists and teachers out there cringing at my technique (or lack thereof), but I really like the messy look:)  I even painted my Velveteen Rabbit with a little gray paint.  


That's it for me!  Big thanks for dropping in!  Take care and see you again soon!

Mahalo and Aloha,
jj

Tuesday, May 27, 2014

Studio Calico Hello, Hello Reveal


It's the 27th of the month and that means reveal day at Studio Calico!!!   The new release is available to subscribers right now, and will be available to everyone at midnight tonight.  I'm so excited to show you my cards from the main card kit Hello, Hello and the Ciao add-on:)  This card above is only a little sneak since I couldn't get a good pic of it, lol!  I used the digital files from the main card kit to create a Cameo cut file.  More to come on another day:)  

Now let's start off with my Ciao cards!  This set has the cutest animal stamps (as you will see below) and I ended up making 3 cards with it!  You can also get the coordinating dies separately:)  For my first card, I used one of those dies and lots of the patterned papers in the add-on kit.  CAS, but fun!


My next card uses the adorable animal stamps in the set.  I love how the animals look in pastel colors:) 


The sentiment banner was so easy to make with the coordinating die:)    (P.S. The yellow polka paper is from the main card kit)


My last Ciao card has the animals again, but this time they are in a little window cutout.  I just love those little animals!  


Here' s a closer look at each window...


Now for the main kit!  So many yummy things in this kit including some awesome dies:)  The rest of the DT did some amazing stuff with the stamps (you must visit the gallery but I thought I'd show you some fun stuff you can do with the dies (the dies are in the main kit btw).  For my first Hello, Hello card, I die cut 5 frames in paper and felt (yes, I said felt!).  I especially love the felt in the kit!  It's stiffer than the normal stuff which is perfect to use in this card.  


I wanted the frames to look intertwined, so I cut each frame and hid the cuts under the frame next to it.  See how that stiffer felt holds up?  Love how it turned out!  The sentiment was heat embossed on a strip of vellum.  This is a fun way to get in a sentiment without it covering up the main attraction;)


  Now you know I couldn't pass up the chance to make some cute little shakers!  This is so easy to do with the frame die.  Each mini shaker is backed with paper from the kit.  I added coordinating sequins in mint hint, sunny day, and blush crush!  Nothing makes this gal happier than some matching sequins;)


For the sentiment, I used the new friend die from Paper Sushi.  If you loved last  month's happy die, you'll want this one too!  I used heavy glitter paper and the die cut it like a champ.  


That's it for me for today!  I hope you check out the entire release over at Studio Calico!  And stop in to the gallery to see all the goodies the Creative Team have put together!

Mahalo and aloha,
jj
Friday, May 23, 2014

Friday with Paper Smooches

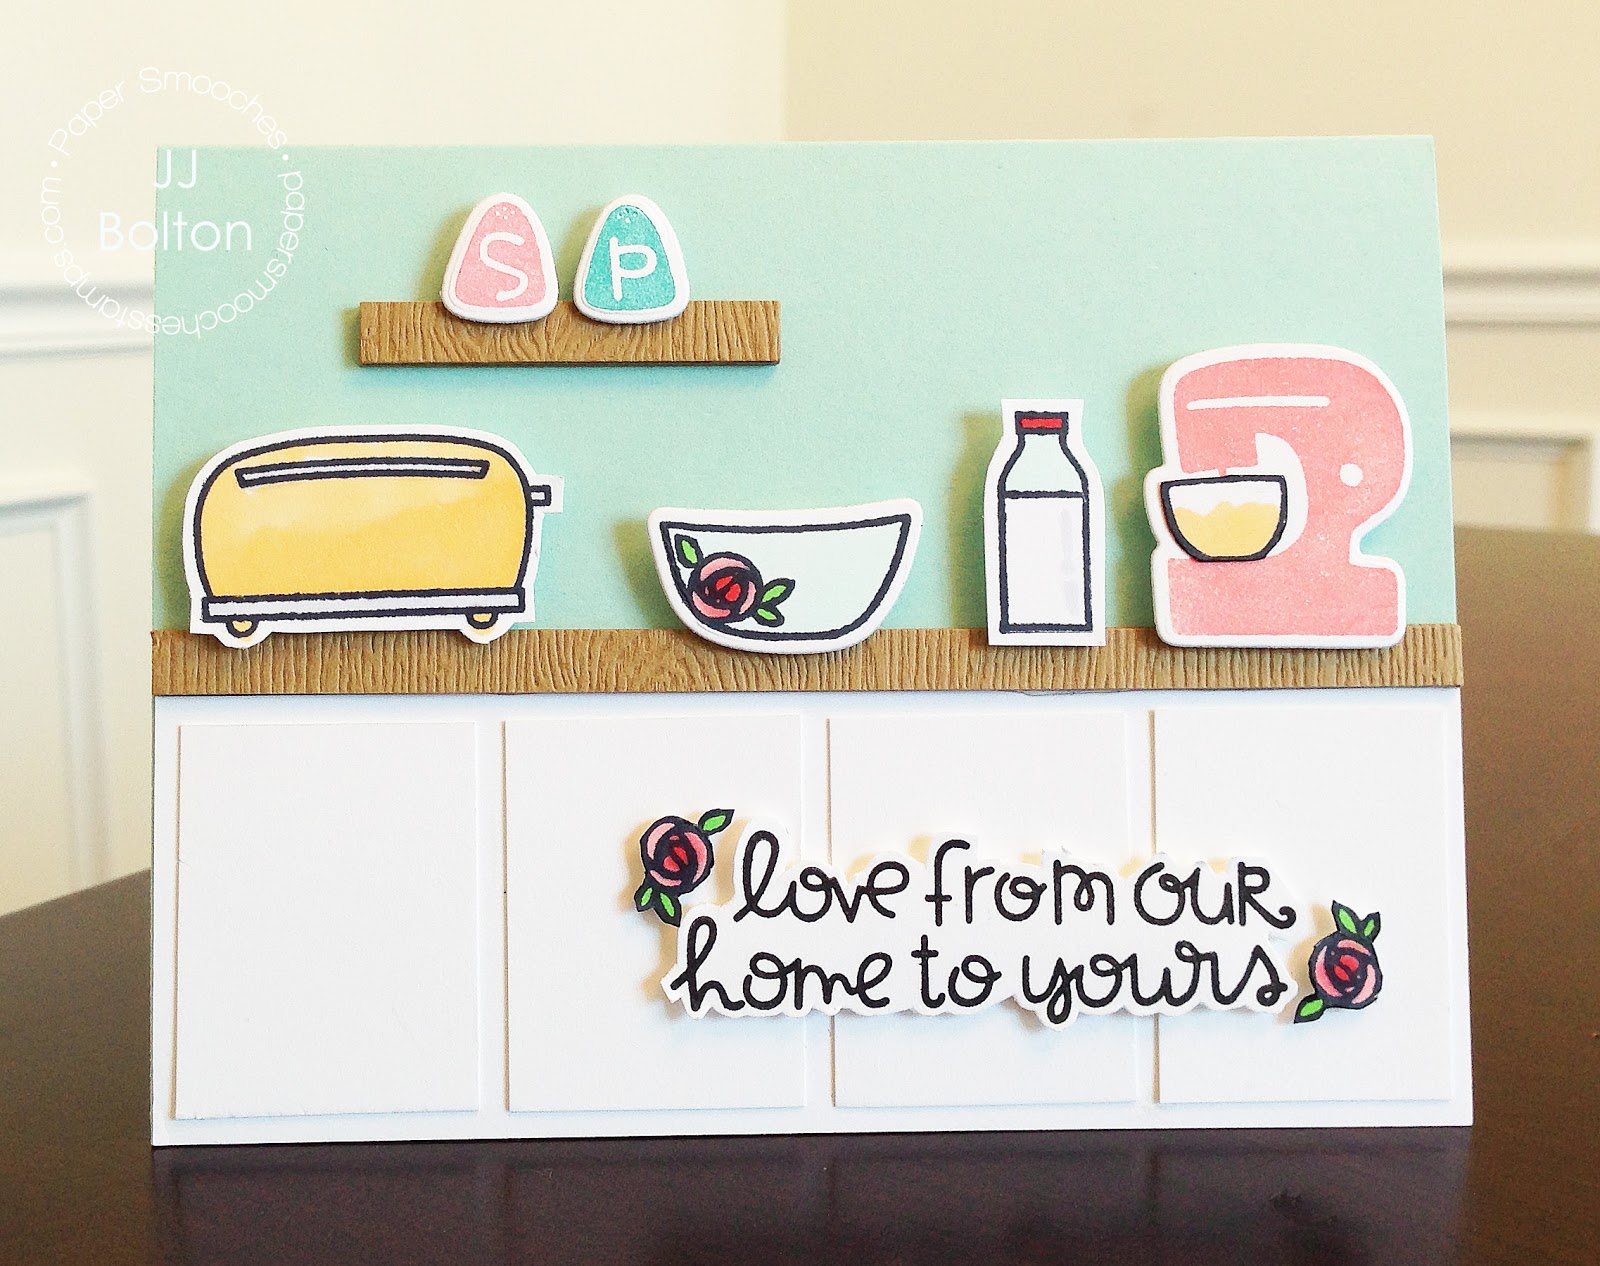
How about some Paper Smooches goodies to start off the weekend? (Yes, I'm starting it now;)  This first card is made with the new Kitschy Kitchen stamps and Kitchen Icon dies.  One of the things I love about Paper Smooches stamps is how they can all be mixed and matched to create fun and unique designs!  For this card, I combined elements of Kitschy Kitchen with a toaster from Wake Up and a milk bottle from Nine Lives to make a fun little kitchen scene.  


To prettify (that's a word, right?) my sentiment, I cut out some of the little roses from the vintage bowl stamp.  That rose is so dang cute!


My next card uses the Flatware dies with the matching spoon die from Kitchen Icons.  I looked through all my Paper Smooches stamps and found some perfectly-sized faces in to make my Daddy, Baby, and Mama spoons:)  I used faces from Spring Fling, Swanky Snowdudes, and Wake Up, but you could also just draw them in.  The sentiment is from A Little Lovin':)


This next card uses the pepper dies from the Desert Icons set.  I used my distress inks to blend some realistic looking peppers and strung them up on some twine that I braided.  The sentiment is from the Alfresco set, and it was the perfect thing for my hot stuff;)


The last card I have to share also uses the Desert Icons set but this time I used the cactus die.  I heart this card big time!  

I inked the background to make what I think of as a southwestern sunset:)  I love using hot pink for sunsets (for those playing along, I used Mustard Seed, Spiced Marmalade, Festive Berries, Picked Raspberry, Faded Jeans, Chipped Sapphire, and Black Soot Distress Inks).  To get a starry sky, I used a paintbrush to flick water along the top edge.  I love what plain water does to the blended ink!

After background dried, I die cut my cactus and the hilly background (with my Borders 1 die).  I put it all over a black card base.  For me, making this card was pure bliss!


I hope you go check out all the Paper Smooches goodies and have your own fun with these great products!   Have an awesome weekend! 

Mahalo and Aloha,
jj

Guesting on the Simon Says Stamp Blog

If you're interested in a couple more ways to use the Avery Elle Custom Panel dies, check out my guest post on the Simon Says Stamp blog today!  Here's a sneak peek at one of the projects:)


Here's a supply list for my guest post in case you were looking!

  • Avery Elle Custom Panel Dies ~ AE, SSS
  • Avery Elle Brushed Stamp Set ~ AE, SSS
  • Avery Elle Cake & Candles Stamp Set ~ AE, SSS

If you're looking for more ideas on how to use the Custom Panels dies, here are some other posts with videos too!


I hope you have a fantastic weekend!!!

Mahalo,
jj

Thursday, May 22, 2014

Textured Die Cuts with Avery Elle

Hellooooo!  Do you have time for 2 quickie CAS cards?  Today, I've got 2 cards that I made with the Avery Elle Set Woodgrain & More!  This stamp set has some large background stamps that are just perfect when you need a little bit of texture.  In my case, I'm using the sets to texturize some alpha die cuts.  

For my first card, I die cut a rounded panel using my Custom Panels dies.  Then I die cut the word "HELLO" with my Avery's Alpha dies just along the edge of the curve.  I went back in and inlaid letters that I cut out yellow card stock stamped with the woodgrain stamp.  The rounded panel is up on foam tape and that makes the letters just hover.  


I did the same technique with an angled panel and the crosshatch stamp.  


Here's a closer look at the hovering letters:)  Very fun!


Until next time!  Hope you're having a great week!

Mahalo and Aloha,
jj

Wednesday, May 21, 2014

Mama Elephant Stamp Highlight: Splendid

Hey everyone!  I'm back today with the new Mama Elephant sentiment set Splendid!  This is another set done by the fabulous Pauline Ibarra!  Can't get enough of that delicious writing!!!  This card is especially apropos today because not only is it the birthday of my twin boys (15 today!) but it's also my hubby's birthday (age withheld, heehee;)!  Needless to say, it's a very special day for me!


I put the sentiment on an angled panel to really give it prime billing.  Then I added some balloons and streamers from the Party Kit set.  The dies really made it simple to do! 

Thanks for checking in today!  I hope you get a chance to visit the rest of the DT to see their Splendid creations!!
Mama Elephant/Kryssi
Pamela Ho
Emily Leiphart
Nichol Ma
Elena Roussakis
JJ Bolton (you are here)

Mahalo and Aloha,
jj

Tuesday, May 20, 2014

Mama Elephant Stamp Highlight: Sightseeing

Hey guys!  We are chugging along with the Mama Elephant highlights this week!  Remember the new release is out now:)  Today we're highlighting the new stamp set, Sightseeing!  I'm a fan of anything England, so I'm seriously loving this set!  These stamps were screaming to be made into a shaker card...


The first step was to stamp the large bridge onto acetate.  I used Stazon ink (a must for acetate) and look how crisp it came out!  Inside the shaker on the card base, I stamped the flags (added the stripes with markers) and sentiment, then added a die cut bus and wheels.   I added a bit of blended ink at the bottom of the card base for the water.  Here's a closer look at the card...


To create the shaker frame, I used the negative cut of my Femme Frames Stitched Frame die.  It makes a perfect frame from an A2-sized panel.  I love how the acetate gives you that 3D look!  

Thanks for stopping in today!  Come back tomorrow for another stamp highlight and don't forget to check out what the rest of the DT has done with this fun set!

Mahalo and Aloha,
jj

Monday, May 19, 2014

Mama Elephant Stamp Highlight: Around We Go

Hey everyone!  It's highlight time at Mama Elephant!  The new release is out now and today we're highlighting the new stamp set, Around We Go!  This is the same set I used for the Stampede here, and this time I took a different approach:) 


I used the large wheel stamp and a bunch of yummy Mama Elephant inks to create a background.  It's such a pretty image and I knew it would make a great pattern.  For my sentiment, I used one of the new ones from the set Splendid.  This one took no time at all and I really like how it turned out!


Thanks for checking in today!  Come back tomorrow for more stamp highlights and today go check out what the rest of the DT has in store for this fabulous set!

Mahalo and Aloha,
jj

Thursday, May 15, 2014

Mama Elephant May Stampede


Welcome to the Mama Elephant Release Design Team blog hop!  Our newest release is now live and available for purchase in the store:

http://www.mamaelephant.com


Today, I'm sharing a project using the new Around We Go set!  This set has so many fun scene building stamps and coordinating dies too!  


Even though I'm not a big fan of heights, I have been known to white knuckle my way through a ferris wheel ride or two;)  That's the reason I couldn't resist pairing the ferris wheel of Around We Go with this sentiment from Wanderlust!   You know that feeling!

The coordinating dies for this set made it so easy to put together a fun 3D ferris wheel.  The bottom layer is the baskets stamped on vellum.  The next layer is the wheel itself dressed up with some Copic coloring and a bit of glitter pen.  The last layer is the die cut base.  I love the way they all come together!  Here' s a closer look at the all the die cuts together...


That's all for me today, but you know I can't let you go before I send out the...GIVEAWAY ALERT!  To celebrate the new release, Mama Elephant is giving away one of each of the new stamps released! Winners will be chosen at random from the collective blogs in the Stampede. Winners will be announced on the blog on the last Stamp Highlights day. You have up to 3 chances to qualify to win! Just leave a separate comment for each!

» Leave a comment on this blog post «
» Like/share us on Facebook: facebook.com/mamaelephant «
» Follow/tweet us on Twitter: twitter.com/heymamaelephant «

READY TO STAMPEDE? The next stop is the wonderful 
Nichol Magouirk!

Here's the full list if you've missed anyone (and you know you don't want that;):

Mahalo and Aloha,
jj

Avery Elle with UmWow Studio and May Arts Ribbon

All this week, the Avery Elle design team is playing with some ribbon from May Arts and fun products from UmWowStudio!    I put all that goodness together, and here's what I came up with...


When I saw the UmWow Heart Confetti mask , I knew it would go perfectly with Red and her little basket!  Using the stencil, it was so easy to make the heart background with a small dauber and some red Distress ink.  I have a bunch of stencils, but I really like how the UmWow ones are noticeably thicker than your average mask.  

To pop out over the stenciled background, I decided to die cut Red on a hill:)  To get her on the hill, I did a partial die cut using the coordinating Red die (you can see all of her is cut but her feet).  [I'm not going to get into partial die cutting here, but there's tons of tutorials out there if you search "partial die cutting"]  Then I used the arc die from my Custom Panels die set  to create each side of the hill.  Because the arc die is open ended, you can just line it up with the end of any cut to create something totally new!   


Here's a close up look at my little Red with the stenciled hearts behind her:)  I never get tired of coloring in these stamps with Copics!  On the top of the card and on her little die cut basket, I added my favorite twine, May Arts Burlap String.  This thin twine is the perfect detail for rustic and natural cards:)  


That's all for me today!  Be sure to check out the Avery Elle Blog all this week for projects using May Arts ribbon and UmWowStudio products!

Mahalo and Aloha,
jj


Thursday, May 8, 2014

Easy CAS Cards with Avery Elle

Hi everyone!  I've got 2 super easy, super CAS cards made with one of my new favorite Avery Elle sets, Brushed!  In this first card, I stamped one of the smaller brushstrokes in 3 colors and inlaid a hello die cut.  That's it!  I get my color fix but in a super CAS way:)  


My second card is a nod to Japanese calligraphy.  I've always loved the look of the painted characters.  For my card, I did some random strokes (bending the stamps for some) and then heat embossed the sentiment in gold.  I love the modern feel of it:) 


Until next time!  Thanks for stopping by!

Mahalo and Aloha,
jj

Friday, May 2, 2014

Blog crashing over at Mama Elephant!

Today I'm crashing the Mama Elephant blog with a post on the new Hello Script die!  I've got one...

and two...


cards to share there!  I hope you check it out!

Mahalo and Aloha,
jj

Thursday, May 1, 2014

Paper Smooches May Blog Hop

It's Pep Rally week and we are here today to share a sampling of the NEW Paper Smooches May/June release with you!  FOUR new stamps and EIGHT new dies will be available to purchase at midnight on April 30th (eastern time) (12:01 am on May 1) You will find our new releases HERE!

For my card today, I used the new Congratulations word die:)  This die is just the thing I needed to make a card for a friend of mine that is expecting.  I'm sending off a gift and this card will go with it...


My friend is a prolific instagrammer, so I thought I'd use my Polaroid dies and Pip Squeak stamps.  In my camera and word die cuts, I used some metallic silver paper.  They totally look like they are made of brushed stainless steel (which I kinda love:).  The Congratulations word die creates a really intricate die cut.  For detailed cuts like this, I highly recommend the Xyron sticker maker.  So much easier and cleaner than using a glue pen (which was the way I used to do it). Here's a closer look at those awesome die cuts!


Since Paper Smooches is working along side of Xyron adhesives this week, they have a special prize to offer one random winner as well.  The prize is worth $100. To see a photo of the prize, please visit the PS blog.  You can visit the Xyron blog  to see what their fabulous team has created with our PS products.  While you are there, you will have a chance to win a $20 gift code to win some PS products!  
  • FOUR winners will be chosen at RANDOM from any of the design team blogs and the PS Blog
  • The prize - a $25. gift code to choose what you like at the PS online store.
  • Just leave a comment on any of the design team blogs listed below or the PS blog for your chance to win!  (you do not need to comment on all blogs to qualify but it increases your changes) 
  • You have until midnight MT on Sunday, May 4th to leave a comment. 
  • Please check the Paper Smooches blog on Monday, May 5th to see if you are one of the FIVE lucky winners.  (four PS winners and one Xyron winner)


To increase your chances of winning:
  • Tell us that you Facebooked about our blog hop
  • Tell us that you Tweeted about our hop
  • Tell us that you posted on your blog about our blog hop
(which means that you have up to three extra chances to win on each blog)

Thanks so much for stopping in!  Hope you have a fantastic day!

Mahalo and Aloha,
jj