Tuesday, February 28, 2012

Window Dressing

I first saw versions of this card on Pinterest (like this and this) and mentally tucked the idea away.  Recently the idea resurfaced in the form of a window!   Like many others, I'm in love with the new Poppystamps / Memory Box window dies.  Turns out the windows also make great dressers:)  And it is the perfect size to match PTI's Gracious Vases stamps! (I used the small Madison window BTW) 

The blooms of the orchid are colored a bit with copics and fussy cut.  The images are stamped in A Muse Titian which is a rustic brown color.    
Converting the window to a dresser is pretty straightforward (all straight cuts).  I used a bit of the Titian ink and Antique Linen ink to bring out the detailing from the die cuts.  Finished up with a few pearl "handles" and that was it!  Hope my coworker likes it:)  
Thanks for visiting! 
{aloha, jj} 

Stamps: Gracious Vases (Papertrey Ink)
Ink: Titian (A Muse), Antique Linen (Distress)
Paper: Vtg Cream (Papertrey Ink), ABC Bubblegum (Mark's Finest Papers)
Embellishments: Pearls
Tools: Poppystamps Small Madison
Saturday, February 25, 2012

PTI February Blog Hop ~ Interactive Cards


When I heard the theme for the Papertrey Ink February blog hop, I didn't want to do a kid's card like I did earlier this month for a Papertrey Ink Anniversary challenge.  I took out my zipper and slider dies that came this week with every intention of making a "grown up" card.  But no dice!  Every idea lead me down the same path.  So I scrapped the whole zipper and slider thing and tried my first pop up card!   

When I first saw the Front & Center 2 die, I hesitated getting it at all even though I loved the shape.  How many gift bags would I make after all?  My heart won out and I've been using it to do cards since I got it.  Inside the frame I used my new Beautiful Butterflies stamps in a variety of colors.  The stamp has a mix of small, medium, and large images, so it really lends itself to this kind of stamping.  I used my Mat Stack 1 and Mat Stack 1 Layerz to create the frame within a frame.  

The sentiment is stamped on vellum and stretched over the aperture.  Just a tip: If you want the background to be more obscured, pop the vellum up.  If you want the background more vibrant, adhere your vellum strip directly over the background.  
Inside is where the movement starts!  I couldn't decide which butterfly was best, so I cut out each of them in different colors.  I'm not a butterfly person, but I have to say I'm in love with the Beautiful Butterflies stamps and dies!  So many possibilities!    

I'm off to visit the other blog hoppers!  I know I'll see some amazing stuff!  As always, thanks so much for visiting!
{aloha, jj} 

Stamps: Beautiful Butterflies (PTI)
Ink: Hawaiian Shores, Summer Sunrise, Raspberry Fizz (PTI), Strawberry (Fresh)
Paper: White, Berry Sorbet, Simply Chartreuse
Tools: Scoreboard (MS), Beautiful Butterflies, MS1, MS1 Layers, Front & Center 2 (PTI)

Tuesday, February 21, 2012

Liebster Blog Award

You know sometimes the www can be a scary place, but today is not that day!  I’ve been very lucky to meet some pretty wonderful folks through my blog and one of my most favoritest (LOL) people, Jeanne at “A Kept Life”, was so kind to give me a Leibster Blog Award last week! 
What is the Liebster Blog award? Here is a quick explanation.   'Liebster' is German for 'dearest'. The award is a 'share-the-love' arrangement, given to inspirational bloggers with less than 200 followers (based on Google followers).

Here's the to-do list of any Liebster award recipient:
1) Thank the giver and link back to the blogger who gave it to you
2) Reveal your five blogger picks and let them know by leaving a comment on their blog
3) Copy and paste the award on your blog (see above)
4) Hope that those you award forward it to their favorite bloggers


Here are my five favorite blogs (in no particular order):

1.  Joyce – Cards-by-the-Sea  
Joyce is one of the nicest folks that you will ever meet!  Her comments make you feel like you’ve known her forever (so nice!).  And her cards have such a beautiful classic and colorful style!
        
2.  Jen W – JENerally Speaking             
I really admire Jen’s clean, graphic, and CAS style.  Her warmth and wit come out in all her wonderful creations!    And she's an animal-lover which is a huge PLUS in my book:)

3.  Jessi – OneCraftyMama       
Jessi is a real gem!  She always leaves the most insightful comments and her blog cracks me up!  And what that girl can do with quilling, crocheting, and patterned papers.  Wowsa!

4.  Chunyuan – Dahlia Memories      
Chunyuan’s blog is one that I discovered through a Moxie Fab Tuesday Trigger.  Her cards are thoughtful and CAS with a soft and delicate feeling.  Her floral cards are a particular favorite of mine!

5.  Karin (Peppermint Patty) – Peppermint Patty’s Papercraft     
Karin is one of the “Mischief Makers” over Waltzingmouse Stamps and her cards are unbelievable!  I love her warm and organic style (she’s the queen of kraft)!  And she always leaves the nicest and most encouraging comments:)

Before I close, I want to say a big "thank you" to Jeanne for being a wonderful inspiration both artistically and personally!  I’m so glad that I found you:)  And although we have different styles, I love that we can find inspiration in eachother’s work. 

Thanks for visiting!
{aloha, jj}

Monday, February 20, 2012

Sunny Easter ~ Less is More Week 55


Easter is one of my favorite holidays, so I'm happy to leave the pink and red hearts behind:)  And since this card uses both a die and a punch, it is perfect for the "Less is More" Week 55 challenge!

You may notice that the stamps I used are winter stamps.  I embossed them in clear and blended the yellow ink over it.  It really gives it the look of a dip-dyed egg!  The die and punch are used in the negative (one of my favorite things to do).  I noticed lately that I've fallen into a rut color-wise, so this card is a new color combination for me.  I really like how it turned out and will definitely try it in other color combinations!    
Today is a holiday here in the US, but a mom's work is never done (wouldn't have it any other way).  I hope everyone has a great day regardless of what you're doing!
{aloha, jj} 

Stamps: Nordic Winter (Waltzingmouse Stamps), Fair Isle Backgrounds/Spring Tags (WPlus9)
Ink: Green (Fresh Ink), Summer Sunrise (PTI), Versamark
Paper: White cardstock, Simply Chartreuse (Papertrey Ink), Sea Breeze (Marks Finest Papers)
Embellishments: Button (PTI), baker's twine (The Twinery), Clear embossing powder
Tools: Egg die (Quickutz), Grass edge punch (Fiskars), Canvas IP/Tiny Tags Die (PTI)

Saturday, February 18, 2012

Waltzingmouse Stamps February Blog Party


If you knew me, you'd know that I'm always late.  And today is no exception!  It's way too late to be up tonight, but I didn't want to miss this month's Blog Party at Waltzingmouse Stamps!  {The party started this afternoon!}  February's theme is "Spring"!  


I live right outside of Washington, DC, so for me, spring means cherry blossoms!  For my card today, I paired up the beautiful WMS cherry blossom stamps (of Asian Gardens) with my new Memory Box window and flower box dies.  A match made in heaven, wouldn't you say?  If you're wondering where the flower box is, it's disguised as chair rail.  I used two die cuts to create the chair rail across the middle.  If you look closely, I also scored the white cardstock on the bottom half of the card to mimic wainscoting.  
If you haven't already tried Memory Box dies, I highly recommend them.  Google "Memory Box Madison Window" and you'll be inspired by all the cool projects using this window die (I know I was:).  Hope everyone has a great weekend and thanks for stopping by!    
{aloha, jj} 


Stamps: Asian Gardens (Waltzingmouse), Sentiment (PTI)
Ink: Memento, Fresh, Martha Stewart
Paper: Papertrey Ink
Embellishments: Memory Box Madison Window & Flower Box

Tuesday, February 14, 2012

Papertrey Ink Anniversary Fun ~ Day 10 ~ Movers & Shakers

This will be a quickie post so that I can get back to my sweeties!  If you haven't already visited the Papertrey Ink site, they are still celebrating their 5th anniversary!  Each day has been a new challenge (along with killer prizes:).  Today PTI introduced some really neat dies for interactive cards (think zippers, pull-out tabs, etc.).  And today's challenge is to create your own interactive card.  
I've made a few interactive cards, but I don't have any special tools for the job.  As you can see for this card, I just used my trusty circle dies. {The picture above was taken before I attached the outer frame to the card base (sorry for the blurriness).}  The inner circle and the outer frame are popped up on foam dots allowing the spaceship to move around the groove.  Take away tip: Use a button instead of a cardstock circle to anchor the moving item because they're smoother and tend to slide better.  
I finished it off with a little bit of stickle bling and a spacey sentiment!  Looks complicated, but really super easy:)  Hope you try it! 
Thanks for looking! 
{aloha, jj} 

Stamps: PTI
Ink: PTI (Fresh Snow)
Paper: Mark's Finest Papers (Evergreen)
Embellishments: Stickles
Tools: Spellbinders (Circles), Corner Chomper

Saturday, February 11, 2012

Papertrey Ink Anniversary Fun ~ Day 7 ~ Hearts Again


Turns out I do have a PTI heart stamp to use for today's challenge!  I found a tiny stitched heart stamp in an older set called Daily Designs and it was just the missing piece I needed for this card.  Do you recognize the inspiration?  (Click here if you're really stumped)  I have to admit that I'm a sucker for sappy movies, but I like my cards a bit less "gushy":)  


The building is made from My Minds Eye patterned paper that I cut down (easy since it's all straight lines).  It's hard to see in the picture, but the stamped heart is embossed (in clear).  The banner is slightly bowed off the page to make it stand out a bit.  Takeaway tip for bowed banners: place a pencil under the middle of the banner when adhering to the card.  That's it for me today!  I've been sneaking in card time in between herding two 12 year-olds through their science projects!  Whew!  

Thanks for visiting!

{aloha, jj} 

Stamps: Daily Designs (Papertrey Ink), Sentiment (WPlus9)
Paper: White, Enchanted Evening cardstock (Papertrey Ink), My Minds Eye PP
Tools: PTI cloud, banner dies

Papertrey Ink Anniversary Fun ~ Day 7 ~ Hearts


Just a quick check-in today to play along with the day seven of challenge over at Papertrey Ink.  

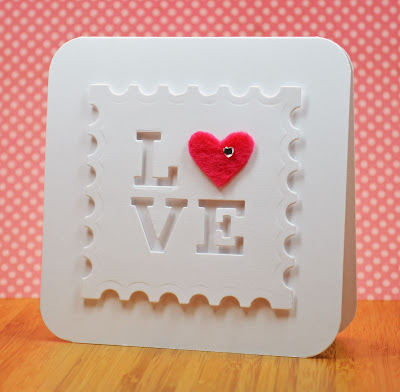
Today's challenge is to create a project that includes hearts.  This turned out to be a real challenge for me because I am seriously lacking in the heart department as far as stamps are concerned!  As you can see no stamps were used today:) 


i carry your heart with me (i carry it in my heart)


I used my PTI alpha dies to cut the letters out and the hand cut the felt heart.  It's hard to see, but I put a small heart-shaped gem inside the felt heart (a la e.e. cummings).  Stop by Nichole Heady's blog!  You still have time to join in the fun!
{aloha, jj} 

Paper: White cardstock (Papertrey Ink)
Embellishments: Felt, heart-shaped gem
Tools: PTI alpha dies, Spellbinders postage die, Corner Chomper

Wednesday, February 8, 2012

Runway Inspired Challenge #5


Today I'm playing along with Runway Inspired Challenge #5!  Even though I've been a fan of the site since it's inception, I have never gotten a chance to play along until today.  This week's inspiration is from the Honor Spring 2012 line.  

I was inspired by 2 elements of the look: the tone-on-tone pattern and sheer fabric of the top.  
To get the same tone-on-tone look, I thought I would use my PTI mehndi medallion impression plate on vellum.  My first try with just the impression plate on vellum was pathetic.  Only traces of the outer edge of the design were visible on the vellum.  So for the next try, I did fake letterpressed it.  I lightly brushed my white ink pad over the medallion design before running in through my machine.  I really like soft and subtle look this technique produced.   Just a tip: Use the ink very sparingly and wipe away any stray ink bits before pressing.   


I glued the vellum overlay across the top and left the bottom unattached.  To cover up where the vellum is glued to the base card, I created a popped up layer across the top.  To create the decorative edge I used the negative side of the Victorian Lace border by PTI (gotta love double-duty tools).  I used my new favorite grey (Slate by A Muse Studio) for the sentiment for a softer look.   


I'm so pleased with how this card turned out!  Thanks for taking a look! 

{aloha, jj} 

Stamps: WPlus9
Ink: A Muse Studio, PTI
Paper: Mark's Finest Papers
Tools: Papertrey Ink impression plate, die