Monday, December 28, 2015

Trio of Paper Smooches Cards & a Farewell


Hello everyone!  I've got a few Paper Smooches cards to share today using the December release dies and stamps.  This first card uses the Adorable Array die which is just gorgeous!  Look at that detail!  I used it to die cut some shiny metallic gold card stock and layered it over a chalkboard sentiment (Delightful Greetings) and some subtle patterned paper.  I added a bit of large gold hexagon glitter and smaller clear iridescent hexagon glitter too (gotta love the shiny, right?).  


My second card uses the Criss Cross die.  This die measures about 3-1/2" square, so it makes a great background.  I used it to die cut some colored vellum and glued it inside of a circle aperture.  Since it's glued to the panel, the die cuts float over the card base.  


The little science guy (Great Chemistry) doubles as an artist when he's holding a paintbrush (Spring Fling).  The sentiment is from the Word Salad set.


My final card today is a shaker card using the Hello Love die and that's it!  The design of the die made it perfect to create a two-toned shaker.  


I stacked about 6 or 7 die cuts and they naturally made an upper "well" and a lower "well".  After I filled each "well", I glued a clear acetate heart over the die cuts to seal the heart.  Then I added one more die cut over the acetate to cover the raw edges of the acetate.  The trick to this look is glue your layers well and let it thoroughly dry before assembling your shaker.  


Before I go, I want to make an announcement that I'm stepping down from the Paper Smooches DT.  It has been an honor to be on the Paper Smooches team and I will miss it so!  Kim is one of the most talented and generous folks in the business (or anywhere for that matter;).  To be amongst the amazing folks on the DT was a dream for sure!  I cannot thank Kim enough for EVERYTHING!  Of course, I will always be a Paper Smooches fan and will be cheering them on from my part of the world always.  I only wish there were more hours in the day;)

To all the Paper Smooches fans I've met along the way, THANK YOU for all your support and kind words!  The Paper Smooches community is such an amazing and supportive bunch!  

Thanks for stopping by today and have a wonderful New Years! 

mahalo and aloha,
jj

Monday, November 30, 2015

Merry Houses with Poppystamps

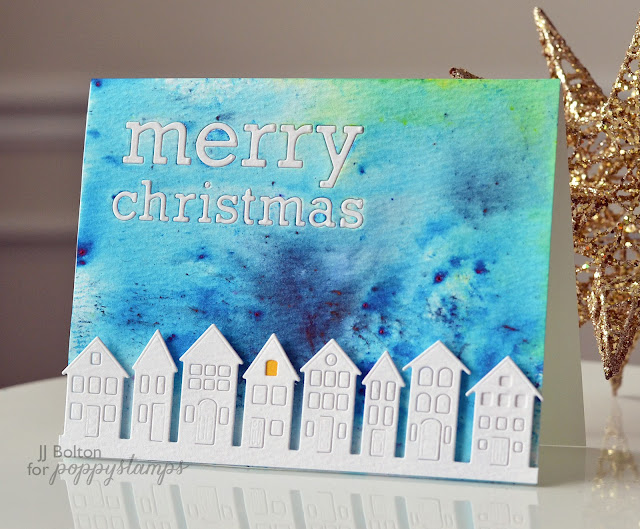
How about one more holiday card idea?  It's not too late to create some handmade cards.  Especially with this idea that is so easy to mass produce but still creates unique cards.  


For the background, I used watercolor powder on watercolor paper.   To get this look, I started by brushing on just water with a wide brush.  Then I randomly sprayed the powders over the paper (just a tip, a little powder goes a long way).  If you love watercolors and are looking for a different look, definitely try the powders! 


The sentiment (Poppystamps Proper Merry Christmas die) was die cut into the background and inlaid back in with plain white paper.  The inlaid technique really makes the sentiment special:) 


The last step was to add the row of houses (Poppystamps Brevilla Houses die) with some foam tape.  I added one last touch with one of the windows backed with yellow.  That's mom up late wrapping the presents and baking goodies;)

Aloha!


Friday, November 27, 2015

Paper Smooches December Blog Hop

It's Pep Rally week and we are here today to share a sampling of the NEW Paper Smooches DECEMBER release with you!  TWO new stamps and TEN new dies will be available to purchase on November 27th at 8:00pm pacific time. Once our release goes live, you will find our new products HERE.  

To celebrate BLACK FRIDAY - we have a special sale for you.  At check out, type the code BFSALE15 in the coupon code box to receive 15% off your entire order.  The sale ends on Saturday, November 28th at 8:00pm PT.

To add extra fun to our blog hop...we are offering up a prize!  The prize - a $25 gift code to choose what you like at the PS online store.

Here are the details:
  • FOUR winners will be chosen at RANDOM from any of the design team blogs and the PS Blog to win the $25 prize.
  • Just leave a comment on any of the design team blogs listed below or the PS blog for your chance to win!  (you do not need to comment on all blogs to qualify but it increases your changes)
  • Deadline: You have until midnight PT on Sunday, November 29th to leave a comment. 
  • Please check the Paper Smooches blog on Monday, November 30th to see if you are one of the FOUR lucky winners. 

To increase your chances of winning:
  • Tell us that you Facebooked about our blog hop
  • Tell us that you Tweeted about our hop
  • Tell us that you posted on your blog about our blog hop
(which means that you have up to three extra chances to win on each blog)
Here's a list of all the hoppers in case you get sidetracked.  Kara Vrabel is filling in for Pamela Ho this month,  We hope Pamela is having a blast on her honeymoon!  :)  AND the amazing Jennifer Mc Guire is playing along with us today as well - yay!

JJ Bolton (you are here)

Now on to the cards!  I have a couple cards today using the new Birds dies.  These dies are the die version of the birds in the Natural Beauties stamp set.  And the 3 birds comes with a cute little branch. I love creating little scenes and these dies make it so easy.  


The branch is inlaid into the smaller cloud panel.  The bird is inlaid with the outline) and the whole thing was attached with some foam tape.  I added a couple leaves to the branch for some more color.  Isn't that little bird die adorable?


This next card uses all 3 of the bird dies.  This time I used the outline die cut as a reverse cut and backed it with a watercolored panel.  A fun and easy way to get a rainbow on your card.  For the eyes, I used a dot of Ranger enamel accents.  The sentiment is from the new set Delightful Greetings.  


Thanks for hopping with the Paper Smooches today!  The next stop on the hop is the fun and lovely Kalyn Kepner!  Have fun!

aloha,

jj

Serene Forest with Poppystamps

So how's everyone doing with their holiday cards?  Today I've got a serene forest scene card in black and white.  


For this card, I stacked 3 layers to create a 3D scene.  The deer layer was done by partially die cutting the deer and then finishing it off with the curved die in the Stitched Landscape set.  (I used the side of the die cut with just the straight line)


The two tree layers were done using a technique where you connect the die cuts end to end.  This is an easy trick to do with open-ended dies like the Stitched Evergreens die.  


On the base layer, I went with black misted with white ink.  I love the monochromatic look!  


I hope this card leaves you feeling peaceful and refreshed!  Have a great weekend!


Thursday, November 26, 2015

Merry Season's Greetings & a Goodbye


I have a lot to say today, but let's talk cards first!  I added 2 more cards to my holiday stash today.  This first one is a shaker that I made with the Avery Elle set, Snow Much Fun, and the matching dies.  For this card I used a technique that I haven't done in a while that has 2 steps: 1) partial die cut for the stamped image and 2) die cut the aperture.  In my case, I partially die cut for the bear/bunny/sled image.  Then I used the oval die and cut the aperture.  The key is to put the cutting edge behind the partial cut edge.  This way the partial die cut stays intact and still attached to the panel. 


After I got my die cuts done, I stamped the image.  I needed a little help centering my stamp, so I used my handy Misti.  


Here's a little closeup where you can see that the stamped image is partial die cut but still attached to the panel.  I had forgotten how much fun this technique is!  I colored the stamp with some Copics (gave the sled a little woodgrain look).  The shaker itself is backed with a cloudy background and filled with styrofoam balls and hexagon glitter.  Seriously, so much fun!


My next card uses the Christmas Florals stamp set and the Sweet Scallops die set.  I just quickly stamped the flowers and foliage in a loose oval shape.  Then I layered 2 die cut pieces over the stamped base.  To get the right color match, I blended ink for the scalloped edge instead of using colored card stock.  


The font of the sentiment is so pretty.  It almost looks handwritten!  


Before I go, I have some news to share.  After more than 3 years and over 180 posts with them, I am stepping down from the Avery Elle design team.  This past year has gotten exponentially crazy with my new responsibilities at work and the boys in their junior year of high school and something had to give!  

The Avery Elle team has been like home to me and I will miss working with those wonderful ladies!  I want to say a special thanks to Jamie at Avery Elle!  It's been an absolute pleasure to know you and to work with you!  Thanks for taking a chance on me all those years ago:)  Much love!

Hugs,
jj

Saturday, November 21, 2015

A Trio of Cards with Paper Smooches

Hello folks!  Are you all in the mood for some more holiday card ideas?  I've got a few Paper Smooches cards to drop today, and I've got two holiday and one "anytime" card.    This first one uses the fun Snowman 2 dies.  I love these outline dies because they make it so easy to make shaker cards!  

First I started with my background.  Since it's a shaker card, the background is all one layer.  I die cut a panel in two with the wavy Borders 2 die.  Then I blended ink on just the upper piece.  I used Ranger white watercolor paper which I really love because it's more white than other watercolor papers I've bought.   You really don't want a yellowy snowman;)


For the shaker part, I used my Fuse tool to create a little sealed pouch.  I really wanted my snowman shaker to be totally filled up, so I used the Snowman die to draw an outline on the pocket page as a guide for fusing.  If you want a looser fill, a simple rectangle would be fine.  The great thing about the Fuse tool is that it is very easy to follow any line, straight or curved, to get that custom shaker.  Here's a pic of me filling the partially fused shaker with my mini styrofoam ball filler.  {BTW, I got the styrofoam balls from the dollar store.  I *think* they are meant to be used to make snow globes.}


As you can see in this close up, I added a couple extra touches to my snowman by drawing in his arms with a marker and substituting paper eyes with black enamel dots.  This was such a fun card to make!  


Here's another holiday card for you!  I used the Evergreens dies.  This card shows you how versatile those outline dies can be when you just use the inside of the dies.  I layered multiple die cuts to create a larger tree.  Each tier is colored with watercolors and the whole thing was misted with white ink.   The background sky is just blended ink.  I really wanted to focus on the tree, so I created a frame with the oval reverse cut and the stub punched corners.  


This last card is not a holiday card, and made a quick colorful card using the Natural Beauties stamps and dies.  My goodness is this set ever cute!!!  I heat embossed the wreaths and then loosely colored each one with my watercolors (the Peerless watercolor papers if you're wondering).  


Thanks for stopping by today!  I hope you have a great weekend!  

Mahalo and Aloha,
jj

Thursday, November 12, 2015

Polarity with Avery Elle

Hey y'all!  I'm stopping in with a quick winter card with cute little bears from the Avery Elle Polar Pals set.  I colored my bears with a bit of white pencil on a kraft paper panel I die cut with the Wonky Stitches dieAren't those little guys cute?


Thanks for stopping by today!    Have a good one!

Mahalo,
jj

Friday, November 6, 2015

Christmas Chalkboard Label with Avery Elle

Today I've got a Christmas card design that would be great for mass producing.  For this card, I used the Avery Elle Fa La La stamp set and the coordinating dies.  If you are looking for new sentiment set for the holidays, you can't go wrong with this set.  The fonts are so versatile and really go with almost any holiday image stamps you've got.  


For my card, I die cut a stitched label (using the You're Invited die) and did it up chalkboard style with some blended white ink.  The sentiment was stamped with Versamark and heat embossed with white detail powder.  I love how the vines wrap around the label.  For a little extra detail, I layered some striped paper over more "chalkboard" black.  


I used enamel dots for my card, but flat sequins would be a great alternative if you want to mail your cards.  

Thanks for stopping by today!    Have a good one!

Mahalo,
jj

Thursday, October 29, 2015

Paper Smooches November Blog Hop

It's Pep Rally week and we are here today to share a sampling of the NEW Paper Smooches NOVEMBER release with you!  TWO new stamps and TEN new dies will be available to purchase on October 31st at 8:00pm pacific time. Once our release goes live, you will find our new products HERE.  

To add extra fun to our blog hop...we are offering up a prize!  The prize - a $25 gift code to choose what you like at the PS online store.

Here are the details:
  • FOUR winners will be chosen at RANDOM from any of the design team blogs and the PS Blog to win the $25 prize.
  • Just leave a comment on any of the design team blogs listed below or the PS blog for you chance to win!  (you do not need to comment on all blogs to qualify but it increases your changes)
  • Deadline: You have until midnight PT on Sunday, November 1st to leave a comment. 
  • Please check the Paper Smooches blog on Monday, November 2nd to see if you are one of the FOUR lucky winners.  
JJ Bolton (you are here)

To increase your chances of winning:
•   Tell us that you Facebooked about our blog hop
•   Tell us that you Tweeted about our hop
•   Tell us that you posted on your blog about our blog hop
(which means that you have up to three extra chances to win on each blog)

Now let's get to the new stuff:)  You can never have too many tags, so I'm happy that this month there's a new set of tags called Gift Tags 3.  This set includes one small tag (unstitched) and a slightly larger stitched tag.  And you know what?  The stitched tag matches the large tag from Gift Tags 2.  Yes, it's the little things that make me smile:)  So for my first card today, I've got a little tag-on-tag action with this little rustic card...


I stamped the large tag (from Gift Tags 2) with some pine boughs and berries from the Holly Jolly set to create a frame for the little stitched tag (from the new Gift Tags 3).  Isn't that little tag so sweet?


Here's another quick idea for these little tags in the Gift Tags 3 die set.  Cut plain white card stock tags and then cut them again with the smallest of the Snowflakes dies.   Then  die cut another set of tags with patterned paper or glitter paper.   Glue the two layers together and you have a set of totally custom tags.  I think this year instead of writing names on the tags, I'm going to use these tags and assign everyone a patterned paper:)  


Thanks for hopping with the Paper Smooches today!  The next stop on the hop is the fun and talented Kalyn Kepner!  Enjoy!

aloha,
jj
Trio of Shaker Tags with Avery Elle


The Avery Elle Naughty or Nice set is especially made for gift tags, so it seemed like a no-brainer to pair it with the Pocket Tag die.  Instead of using the tag pockets for a gift cards, I turned them into a mini shakers:)   Seriously, who doesn't love mini stuff?


The first step was to cut my tags (with a window added).  Then I added a bit of patterned paper to each tag for a background to the shaker.  I wanted to add one more element, but I needed petite images to match the scale of the mini shakers.  Luckily, the new Avery Elle release has a bunch of mini images, so I had just the perfect stamps to dress up my mini shakers.  


The shaker packets themselves were made with my Fuse.  Since the shape of this shaker is a simple square it was incredibly simple to put together.  Just fuse 3 sides, add your fillers, and then seal the last side.  


I can't wait to use these tags this year!


Thanks for stopping by today!    I hope you have a wonderful day! 

Mahalo,
jj

Saturday, October 24, 2015

Christmas Cards with Paper Smooches

I'm just stopping in with a couple Paper Smooches card!  (As you can see, I'm still plugging away at my holiday cards:)  This first card uses the Holly dies and one of the new sentiments from the set Holiday Cheer.  This card uses a template that I use often, white panel over a colorful partial background.  I used one of the Borders 1 dies to get that curve on the white panel.   


To color my holly leaves and berries, I used watercolor powders.  Whether it be watercolor powders, traditional watercolor (I prefer Peerless), or Distress Inks, I love the different shades you can achieve.  To me, it adds so much to the look of a card versus flat color of colored card stock.  Here's a closer look at that coloring...


My next card uses the beautiful Merry Christmas die.  I did a little stacked stamping but this time, I layered a white die cut over a black die cut.  Over the top of the card, I stamped and heat embossed a bunch of snowflakes (from the Cool Dudes set) and blended some Distress Ink over it.  


Thanks for stopping by today!  I hope you are having a great weekend!  

Mahalo and Aloha,
jj

Thursday, October 22, 2015

Minty Christmas Wreath with Avery Elle


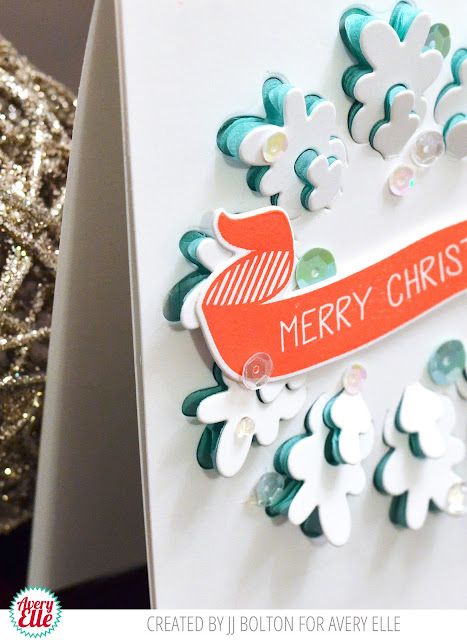
Hi guys! I'm still working on my holiday cards, and I've added one more this week.  This card uses Avery Elle's Pop Up Wreath die and the Fa La La stamp set and matching die to create a more modern, graphic wreath card.  The Pop Up Wreath die cuts a 3D design that you can lift up off the card.  Since the pieces of the wreath lift up, whatever you back your wreath with is visible.  In my case, I stacked several layers of mint-colored tissue paper behind my white card stock panel and then die cut the wreath.  The layers of cut tissue paper make a petal-like design.  


Here's a little closer look at the layers of tissue paper behind the top card stock layer.  (If you have honeycomb tissue paper, I bet that would work too)  On top of the wreath, I added the sentiment banner and a bunch of white, clear, and mint sequins and acrylic drops.  I can't wait to try this out with other colors of tissue paper!


Thanks for stopping by today!    I hope you have a wonderful day!

Mahalo,
jj

Tuesday, October 20, 2015

Essentials by Ellen Holiday II 2015 Blog Hop


Hello and welcome to the Holiday II Essentials by Ellen Release Hop! I’ll be showcasing some of the stamp sets and dies from the new release!

Are you ready to see some fun new stuff?  You may see some stamps that you're already familiar with in this first card.  The stamp set, Autumn Acorns, was actually released last year, but now there are matching DIES!   Who doesn't  love a matching die?  These dies made it so easy to create this Thanksgiving card!  I simply stamped and heat embossed a bunch of the outline acorns and leaves onto watercolor paper.  Then I die cut each piece and used my Peerless watercolor papers to paint each one.  


I arranged them around a circle that I painted in a faint sky blue (and splattered with some white paint) and attached the leaves with glue or foam tape.  Here's a  closer look at the wreath...


For my next card, I'm using the new stamp set, Holly Jolly, and the new matching dies for the previously released stamps, Christmas Scribbles!  The Holly Jolly set has sentiments in the most fabulous font. And I love that the sentiments are so large!  I decided to use a technique I like to call stacked stamping where you stamp the design once on the card front and then layer it with the die cuts of the same images.  This is fun to do with a design that has both images and words like this...


I love how the bold sentiment looks over the delicate "scribbled" stamps.  Here's a side view where you can really see how it's layered...


That's it for me today, but before I go, let's talk freebies:)  I get to give away an Essentials by Ellen stamp set!  The winner may chose ANY Essentials by Ellen brand stamp set (maximum value $15) currently in stock at Ellen Hutson.com  To enter my giveaway, please leave a comment on today’s post with a valid email address by October 27th!

Here's a quick look at the entire new release...

BTW, there's also a crazy good Grand Giveaway in the CLASSroom!  To enter, be sure to leave a comment there, also by October 27th, with a valid email address; winners will be announced at the CLASSroom on Friday, October 30th!

The next stop on the hop is the Heather Campbell!  (If you're going in reverse order, the next stop is Laurel Beard;)  Thanks so much to Ellen and Julie for asking me to participate in this blog hop:)  Happy hoppin’!

Mahalo and aloha,
jj