Saturday, June 25, 2011

Papertrey June Blog Hop Challenge


This is the first month I've ever participated in the monthly Papertrey Ink Blog Hop.  I've lurked and lurked, but I always felt like I never had the "right" stamp or idea.  But the point of the Blog Hop is to motivate you to try something different and to get to know some of the other PTInkers out there (both of which are great ideas), so here goes nothing:)  This month, the challenge is based on this inspirational image rather than a theme.  
 From Design Sponge website
I wanted to try the blended stripes in the inspiration picture.  I knew I wanted to use my copics to try to get this effect, but I have to admit that copics scare the heck out of me.  Even buying the markers was intimidating.  What colors do I buy?  What colors go together?  What the heck does the blender do?   I still don't know the answers to these questions, but I went ahead with my plan anyway.  I wasn't ready to do a whole background, so I thought I would die cut one of my practice sheets.  I only have enough copics to do pink and green:)  
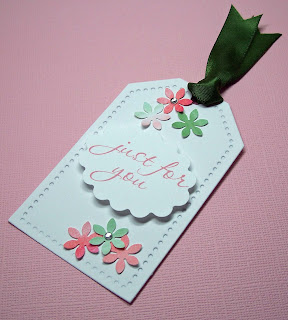
After cutting the leaves, I had some extra gradient paper that I didn't want to waste.  So made a few more flowers for a coordinating gift tag.   I didn't have a stamp to match, so I made a custom sentiment.  This set is for an almost teen girl, so I tried to keep it young and fresh, but not childish.    
I also did a quick gradient card this morning with watercolors.  I whitewashed the over the watercolors for a softer look.  This is the only picture that I could get to work, but you get the idea (in person, the colors are a lot more muted and that's hard to photograph).  
I'm looking forward to seeing what all the other PTI Blog Hoppers have created.  Thanks for looking and happy hopping! 
{aloha, jj}

Leaf Card & Tag
Stamps: Communique Curves, Matstack #4 (Papertrey Ink)
Ink: Spray Rose Pink (Martha Stewart)
Paper: White cardstock (Papertrey Ink)
Embellishments: Small white rhinestones
Tools: Tag and Matstack 4 dies (Papertrey Ink), Oval scallop and small flower punches (Fiskars), Linen/Canvas impression plate (Papertrey Ink)

Watercolor card
Stamps: Think Big #3 (Papertrey Ink)
Ink: Black (Memento)
Paper: Berry sorbet cardstock (Papertrey Ink)

Embellishments: Small white rhinestones
Tools: White tulle
Tuesday, June 21, 2011

Waltzingmouse Stamps - A Year of Sketches

Over at the Waltzingmouse Sketch Challenge blog, they are celebrating a whole year of sketches!  So for Challenge #52, you get a choice of all 51 sketches from the previous year.  There were so many fun and interesting choices, but here's the one that caught my eye...  
This week I worked on a kind of card I haven't done in a while, a bridal shower card.  Most of my friends are married and it seems that I've moved into the "friend of the mother-of-the-bride" stage in life, ack!  I still love a good wedding though!
You may be asking yourself, where is the WM stamp?  Look closely and you will see that I used my Dainty Doilies stamp to give my bride's dress some golden lace.  The black oval is actually cut into the frame and backed with a textured black cardstock.  The dress is cut out and popped up with some foam dots.  The cream swirls of the frame are dry embossed with a Cuttlebug embossing folder.  I didn't have a sentiment to fit, so I printed out my sentiment on vellum and accented with pearls.  It's hard to see in photos, but the ink is a lovely shimmery gold (I've heard that gold is making a comeback:)  
Dainty Doilies has been my go-to stamps lately, but hopefully soon I'll have some new WM favorites.  {Raise your hand if you're anxiously awaiting the July WM releases!}  Thanks for looking! 
{aloha, jj} 

Stamps: Dainty Doilies (Waltzingmouse Stamps), Happily Ever After (Lawn Fawn)
Ink: Galaxy Gold (Tsukineko pigment)
Paper: Cream and black cardstock from stash, vellum
Embellishments: Pearl accents
Tools: Oval (Spellbinders)

Saturday, June 18, 2011

CAS-ual Fridays Color Blocking

This week has been a blur and I've had less than zero time in my basement craft corner, so I'm easing back into things with a card made in a color block style a la the CAS-ual Friday Challenge CFC7.  
These are some of my favorite colors and polka dots always make me happy.  I like how the patterned paper almost looks like a cutout overlay.   I wanted to put a rhinestone accent after the sentiment, but didn't have a dark hot pink one to match.  Definitely need to work on my embossing skills, but I still like how the card came out!  
All my guys are going to the US Open on Saturday, so hopefully I'll get some time to play with paper this weekend.  I still have to catch up on my Father's Day surprises, but I'm going to sneak some crafty time too.  Thanks for looking and I hope everyone has a great weekend! 
{aloha, jj} 

Stamps: Big & Bold Wishes (Papertrey Ink)
Ink: Versamark
Paper: White, raspberry fizz, orange zest, hawaiian shores solid cardstock & dotti biscotti patterned paper (Papertrey Ink)
Embellishments: White embossing powder
Tools: Corner chomper

Monday, June 13, 2011

Waltzingmouse Doily Rosettes

In an effort to use what I've got instead of buy more stuff, I worked on making rosettes the low-tech way.  I'm sure a bunch of you are over rosettes, but I'll still love them even when the trend is long dead.  Being new to this cardmaking thing, I never thought I could make them without a fancy die.  When I did my research on the rosette dies, I found out that not only would I need the die, but the extended plates for my Cuttlebug as well!  {Isn't that the case with papercrafting supplies?}  Don't get me wrong, I've spent more than I care to admit on paper-related supplies, but I just couldn't justify these purchases.   
So that leads me to my experimentation!  After watching a bunch of YouTube videos, I got out the old score board and started to wing it.  I used strips of paper measuring 2" by 11" and scored them every 1/4".  {If you want them with a decorative edge like I did, edge them before scoring.}  The end result was a rosette almost 3" across (in blue).  I experimented with the width and length of the paper strips to make rosettes in smaller sizes.  I still have a long way to go, but the upside is that this technique is very forgiving!  
Instead of using patterned paper, I stamped my strips of paper with Waltzingmouse doily stamps.  For the center of the rosette, I fussy cut one of the smaller doily stamps.  There's alot going on with the rosette, so the rest of the card is pretty simple.  I didn't have a proper stamp sentiment to fit, so I printed the frame/ sentiment on the computer.  
I'm off to post this one on the Waltzingmouse Sketch Challenge site for sketch #51!  Thanks for looking! 
{aloha, jj} 

Stamps: Dainty Doilies (Waltzingmouse Stamps)
InkBahama Blue, Rose Bud, Pear Tart (Memento)

Paper: White cardstock (Papertrey Ink)
Embellishments: None
Tools: Lace edger (Fiskars), Scoring board (Martha Stewart)

Sunday, June 12, 2011

Let's Start Summer

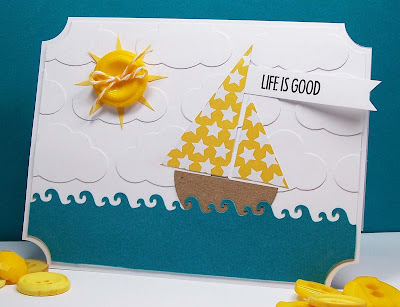
You know what they say, it's summertime and the livin' is good!  Summer doesn't officially start until June 21st, but it sure feels like summer here in hot and muggy northern VA.  So for this week's CAS-ual Fridays Challenge I've got summer on the brain.  Instead of the usual challenge (by sketch or color or theme), this challenge has a twist.  From the choices below, you choose any three elements in a row just like tic-tac-toe.  
I went with a diagonal choice of buttons, dies or punch, and emboss.  I cheated a bit on the embossing with a "faux-boss".  The background is actually punched clouds glued in a pattern to resemble embossing.  
That started all kinds of other punch craziness.  First, I used my large punch to make a half circle for the boat.  Then I punched out a large flower and snipped the petals to make a sun spray for under my button.  
Then I used my small circle punch to cut out 1/4 circle pieces in each corner of the card. I did it in two phases so that the card and the background were two different sizes and the card remained the frame.  
I didn't have the sentiment I wanted in a stamp form, so I did it up on the computer ("Headline Two" font for the font nerds out there... free from dafonts, thankyouverymuch!).  I left the sentiment waving in the sea breeze off the page.  Ahhhhhhh!  Happy summer to everyone and thanks for looking!  
{aloha, jj} 

Stamps: None
Ink: None
Paper: White and kraft cardstock (Papertrey Ink), Yellow star from a paper pad, Blue (Coredinations)
Embellishments: Buttons, baker's twine (The Twinery)
Other: Large circle punch, small circle punch, large cloud punch, flower punch, wave edger (Fiskars)

Saturday, June 11, 2011

Moxie Cosmopolitan Neapolitan

This week's Moxie Fab Tuesday Trigger brings back so many memories.  My Dad comes from a long line of ice cream lovers and as a kid, Neapolitan was always in the freezer.  I was probably 6 or 7 before I realized that the supermarket actually sold single flavor cartons of ice cream!  Today, my Dad (now Papa Joe) has recruited new members to the ice cream-lovers club (my 2 sons), but Neapolitan is still a go-to flavor.  
It was easy to pull the yummy colors from the inspiration pic.  I went with the classic colors of soft white, chocolate brown, and a blush pink.  I brought in the light wood of the stick in the stamped leaves which are done with a wheat chalk ink.   
And for fun, I added a cherry button on top.  I wanted to keep the visual clutter to a minimum, so I decided not to add a tag and stamped my sentiment directly onto a leaf (curved around the shape).  The soft wheat color is difficult to photograph, but the close up photo is closer to what it looks like in person.

I popped up the leaves and added the 3 rhinestones for a little bit of interest.  All done.  And for picture time, Maybelline the bird came out to get her picture taken (wave hi May!).  Thanks for looking! 
{aloha, jj} 

Stamps: Bloom & Grow (Verve), Faux Ribbon (Papertrey Ink)

Ink: Wheat Chalk (Versamagic), Rich Cocoa (Memento)
Paper: White cardstock (Papertrey Ink), Pink textured (Coredinations), brown from stash
Embellishments: Buttons, pink rhinestones, baker's twine (The Twinery)

Other: Scallop Edger (Fiskars), Swiss Dot Embossing Folder (Cuttlebug), sewing machine, Corner Chomper, foam dots

Friday, June 10, 2011

Colo{u}r Inspiration

From Yellow Press Weddings
I get color inspiration (or colour inspiration for my international friends) pretty much anywhere.  My latest color crush is yellow and grey.  Part of this crush stems from my love for yellow poms (cephalaphora aromatica).  They are those adorable little round flowers in the arrangement pictured.  I'm far from being a bride (15 years married this year, yikes) but I am enamored with the thought of these poms in a bridal bouquet.  Pair that yellow with a modern dove gray, and I'm all over that. 
So last night I did up a set of thank you cards in just those colors.  I didn't plan on the pattern, and just picked up pieces from the Modern Basics PTI set that I liked and fit.  After a hard day, it was nice to let my mind wander.  As much as I love stamping and cardmaking, I have a tendency to over think things.  I resolved last night to let go a bit and enjoy the process more.  I'm really happy with these cards and I hope that the recipients know how much I really appreciate them!  
I know there are a ton of card blogs and sites out there with color ideas, but I really like this (of all things) wedding site called Yellow Press Weddings.   They have some great color combination ideas and some really inspiration pictures to go along.
Thanks for looking! 
{aloha, jj} 

Stamps: Modern Basics (Papertrey Ink)
Ink: Dandelion and London Fog (Memento Dewdrops)
Paper: White cardstock (Papertrey Ink), Yellow textured from stash
Embellishments: Buttons

Thursday, June 9, 2011

Winging it for MIM#18

Hubby is working nights this week, so when the twins get to bed, the real mom work gets done.  In between the cleaning and laundry and paying bills and doing all that good stuff, I can usually eke out a card:)  Tonight, my goal was to try the tissue overlay technique demonstrated by Betsy Veldman at Papertrey Ink for Make It Monday #18
I stamped the bottom of my kraft base with woodgrain in a rich brown and added the white tissue paper over it (just over the woodgrain part).  I didn't have any lovely vintagey tissue paper like Betsy, so to give it a more natural look, I added walnut ink to my Elmers glue.  The tissue paper gave the woodgrain a funky look and texture (which I'm digging), but the effect was not what I expected at all!   
I had a lot of brown going on, so I lightened and colored it up with some rustic cream and ripe avocado elements.  Favorite element = cork flower!! 
Now it's off to bed for mama!  Have a good night and thanks for looking! 
{aloha, jj} 

Stamps: Modern Basics (Papertrey Ink), Fly Free (Lawn Fawn), Woodgrain (Hero Arts)
Ink: Cocoa Brown (Memento)
Paper: Rustic cream and ripe avocado cardstock (Papertrey Ink), plain white tissue paper
Embellishments: Button, cork, baker's twine (The Twinery)
Other: Labels 8 and Big Scalloped Circles Lg (Nestabilities), Mat Stack 4 and Buttoned Up #2 (Papertrey Ink), Polka Dot embossing folder (Cuttlebug)

Monday, June 6, 2011

Wait for it...

This is one of those cards that I didn't LOVE at first, but something about it is growing on me!  Inspired by the  Moxie Fab The I'm Sew Excited! Challenge!, I made this to tuck into my card stash (got the perfect person, who will have to wait;)  
This one was a lot of fun to make!  I love, love, love the Lawn Fawn needle and sewing machine.   {They stamp like a dream}   I didn't have a ruler stamp, so I just cut a strip and wrote in the lines with a fine tip Sharpie.   
And how can you not like a little tomato and strawberry (btw, tomato and strawberry, who thought of that?).  I used my small flower punch and circle punch to make the tomato.  Too much fun!
{aloha, jj}

P.S. I just wanted to post what came with my recent Lawn Fawn order.  An actual handwritten note and a bonus stamp!  Well, Mike, wherever you are dude, big ups to you and Lawn Fawn!  You definitely made a fan out of me!  Thanks!  {aloha, jj}
Stamps:  Sew Lovely (Lawn Fawn), Typewriter Alphabet (Plaid)
Ink: Versafine Onyx Black
Paper: White, red, gold cardstock (Papertrey Ink), Polka dot (Lush)
Embellishments: Buttons, embroidery thread, narrow grosgrain, petite clothespin, ball stick pins

Other: Scallop edger, circle punch, small flower punch (Fiskars), foam dots

Sunday, June 5, 2011

Nom Nom Nom

I'm playing with the CAS-ual Fridays' sketch challenge today.  Here's this week's sketch...
This little card seems pretty straightforward but I did end up using a bunch more tools than I thought.  I used my Silhouette to cut a custom-size mask for the cookie and for the teeny heart.  Using the mask I sprayed with the walnut ink and then used the distress ink to fill in the blanks.  I even used my scalloped oval punch to take a "bite" out of the cookie.
BTW, I'm so confused on the what a single layer card is.  I'm thinking ribbons, buttons, and such count for a second layer, no?  
Thanks for looking! 
{aloha, jj} 

Stamps: Plaid Typewriter Alphabet rubber stamps
Ink: Walnut Ink spray (Tsukineko), Tea Dye (Distress Ink), Timber Brown (Stazon)
Paper: Rustic White cardstock (Papertrey Ink), orangey-red cardstock from stash
Embellishments: Buttons 
Other: Fiskars scalloped oval punch, Silhouette, Fiskars heart punch

Saturday, June 4, 2011

Sun Stamping

When I saw this inspiration pic for this week's Moxie Fab Tuesday Trigger, I immediately thought of cyanotypes!  Cyanotypes are "prints" made from photosensitive paper that reacts to sunlight.  The results are beautiful silhouette prints in shades of white and Prussian Blue.  
My day job is as a scientist, so this type of thing appeals to both sides of my personality.  The result is this set of cyanotype mini cards!
I didn't have an idea of what plants I would use, but I just gathered up anything in my backyard that had a neat shape.  Each print takes about 4 minutes to expose but you will have to let the paper dry (soaking in water stops the exposure).  Just added a tiny tag and a button and called it a day.  Here are some closer views...


I just love the detail and all the different tones.  Can't wait to try this again!  I'm saving up keys for the next round.  Thanks for looking!


{aloha, jj}


Stamps: Faux Ribbon (Papertrey Ink)

Ink: Mix of China Blue (Distress Ink) and Royal Blue (Colorbox)  
Paper: White (Papertrey Ink), Sunprints brand cyanotype paper 
Other: White embroidery thread, buttons, Fiskars scalloped oval punch, Corner Chomper