


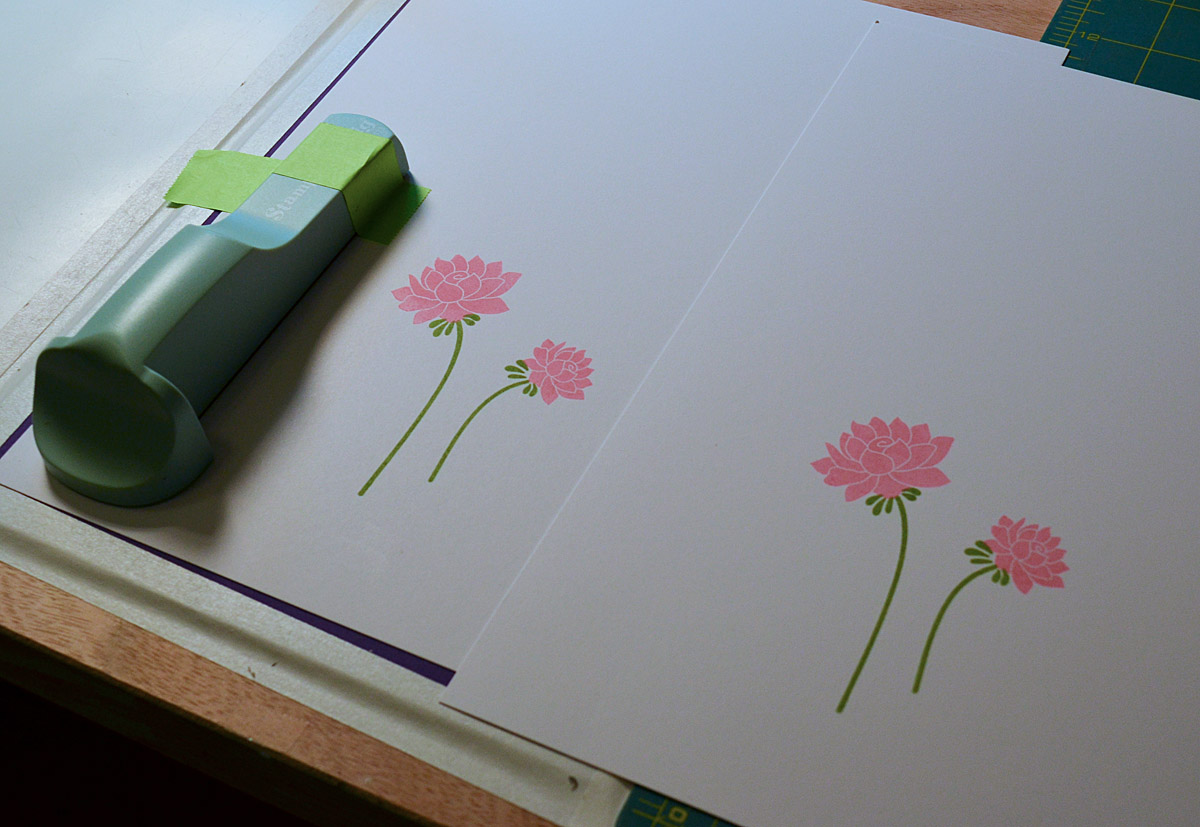
I start off by choosing my stamps. Stamps that are simple, solid, with good spacing between the images work best. For this card technique to work, you need to create two stamped pieces that are exactly the same. There are probably many ways to do this, but here's how I do it. I apply my stamps to acrylic blocks by ink color. In the pic above (left), the bottom block has my stems (green) and the top block has the blooms (pink). I use my stamp placement tool (in this case a Stamp-a-majig) to arrange them on the blocks so that each block lines up against the Stamp-a-majig. The Stamp-a-majig stays in one place and each color can be stamped at a time. Tip: Stamp onto large pieces of cardstock. Do not trim your panel to size before stamping. Trimming after you stamp will always be easier and give you better results.

Now that you have your two exact copies stamped, it's time to diecut. I use Post-It label tape to align my letter dies. This tape has the perfect amount of stickiness and it gives me a nice straight edge to line up my letters. Try not to crowd the letters. Test out the alignment on a scrap piece of paper until you find an arrangement/alignment you like.


Place the taped dies over one of the stamped images. It doesn't matter if the dies line up with the sides of the paper, you will be trimming the final panel later. You just want to center the dies over the stamped images. The die cut letters tend to look better if they are partially white (not totally covered in pattern). Once you've die cut your letters, lay them out over the clean, uncut stamped image before you start gluing things down. If you're having trouble placing the letters, use the reverse cut of the letters as a guide.


Once you have the letters laid out in place, place a ruler along the bottom of the edge of the letters. I try to use as little pencil marks as possible, so I only make a small mark on the far right and far left to denote the straight line across the card. You will also want to mark the left edge of the die cut letters (in front of "t" and after "s"). This will give you some reference points to help you trim the panel. In my case, my letters aren't centered on the panel because I wanted to stamp the grass at the bottom.
Once the marking is done, remove the laid out letters and trim the panel *before* you adhere the die cut letters. Once trimmed, adhere the letters with small pieces of dimensional foam tape. Tip: When using foam tape to adhere die cuts, use at least 2 separate pieces. For example, on the letter "h", I have foam tape on each leg of the letter. This will prevent each piece from teetering. For better control, use a pair of tweezers.

Once the marking is done, remove the laid out letters and trim the panel *before* you adhere the die cut letters. Once trimmed, adhere the letters with small pieces of dimensional foam tape. Tip: When using foam tape to adhere die cuts, use at least 2 separate pieces. For example, on the letter "h", I have foam tape on each leg of the letter. This will prevent each piece from teetering. For better control, use a pair of tweezers.

You will notice that I stamped the grass after I adhered the letters. I don't recommend doing this because you run the risk of the acrylic block coming into contact with the adhered letters. You don't want stray ink to spoil the fun! I finished this card off with a bit of rounding at the top edges (to counterbalance the straight lines of the block letters). I know this *seems* like a lot of complicated steps, but truly it's easier than it seems. If you like this look, I really hope you try it out!

I'm off to link up to this week's CAS-ual Fridays Challenge (CFC50): April Showers Bring May Flowers. If you want to play along, you've got until Wednesday evening! If you have any questions at all about the instructions above, feel free to email or leave a comment. As always, THANK YOU so, so much for stopping by!
{Aloha, jj}
Paper: Cover Smooth White 100 lb 188091 (International Paper)
Stamps: Daydreamer (PTI)
Ink: Pink Lemonade, Basil (Fresh)
Tools: Block alphabet dies (PTI), Corner Chomper
Totally awesome, again!
ReplyDeleteThank you for sharing your technique! This card is stunning, too!
ReplyDeleteThis is absolutely beautiful. Thanks for showing your technique. You should be on a design team. You have such wonderful ideas, and always pushing the edge of the envelope.
ReplyDeleteThank you, thank you, thank you! This is such a neat technique. Having the pictorial step-by-step is so helpful for those of us that need to see it in action. I can't wait to give it a try.
ReplyDeletegorgeous and great instruction.
ReplyDeleteOh, I am a visual person - so thank you very much for this tutorial!
ReplyDeleteAwesome!!!! Great explanation!!
ReplyDeleteI originally thought your embossed the letters from behind the image!
AAhhh ... a look into your creative genius!!! THANK YOU! Your directions are clear and easy to follow - I will definately give this a go JJ! That card is just gorgeous - I appreciate the directions!!
ReplyDeleteFabulous card! I am seriously in love with this! I am going to try to re-create something similar using my Silhouette. Thanks for the inspiration.
ReplyDeleteThis is so awesome JJ!
ReplyDeleteThanks for the tutorial. It's a spectacular technique.
ReplyDeleteThanks for the fabby tutorial! Very clear and easy to understand - I'll definitely have to try this!
ReplyDeleteHugs!
x
Absolutely COOL and BEAUTIFUL!! Love it! Thanks so much for playing with us at CAS-ual Fridays!
ReplyDeleteThank you for showing. I had seen some cards made with this technique and was wondering how they did do this, so now I know.
ReplyDeleteBeautifully clear tutorial, JJ! I love the look - it is so incredibly classy & gorgeous :)
ReplyDeleteA real stunner! I never would have figured out the technique so I really appreciate your tutorial.I agree with Joyce. You aren't a plain vanilla crafter! Glad to have found your blog!!
ReplyDeleteSo glad you are willing to share your creative genius. Beautiful blog, I know I will be a frequent visitor. THANK YOU!
ReplyDeleteAnother gorgeous card with this technique! Thanks so much for sharing your step-by-step photos!
ReplyDeleteBrillant! What a lovely card and a great technique! Thanks so much for sharing your process!
ReplyDeleteTechnique triumph! Thanks so much for showing us how!
ReplyDeleteGenius! Going to CASE this technique for a card I need for Sunday, perfect timing!
ReplyDeleteThanks for the great explanation for this technique!
ReplyDeleteI managed to figure out how to do this with my Silhouette. You can see my card @ http://sabrioletdesigns.blogspot.com/2012/05/thank-you-card-box-set.html. Thanks again for the tutorial and the inspiration!
ReplyDeleteYou cards are super duper creative! How do you think up these ideas?
ReplyDeleteJJ, this is KILLER amazing!! Like mind blowingly BRILLIANT! Thanks so much for playing with us at CAS-ual Fridays! We're so glad you did!!
ReplyDeleteGREAT turorial! Love the effect of the raised letters with the stamping! So beautiful!!! :)
ReplyDeleteFabulous tutorial, JJ! Thank you so much for sharing this technique with us. It really gives such a great effect to this stunning card. :)
ReplyDeleteWOW-what an amazing technique! LOVE the card. Thank you for the tutorial, I can't wait to try it!
ReplyDeleteWhat a great tutorial...so easy to follow and an absolutely drop dead gorgeous card again with this technique. I really will try it soon :0)
ReplyDeleteJenny x
Love this one too. Thanks for sharing with us how you do it. Can't wait to give this a try.
ReplyDeleteThanks so much for sharing this tutorial!!! it is a fab technique! will surely try it!
ReplyDeleteThis is great JJ, I love the beautiful card you made, and the fab tutorial too, a wonderful idea!
ReplyDeleteFantastic technique and tutorial!
ReplyDeleteCongrats on your CAS win! This card is FABULOUS! Love the design!
ReplyDeleteSimply beautiful card and great tutorial!! Congratulations on your well deserved win.
ReplyDeleteThis is so freakin' fantastic!! I adore this card!!! Thanks so much for sharing the tutorial. I may have to give it a try!!
ReplyDeleteYour card is so beautiful! Thank you so much for the tutorial. I can see making this card for my mom.
ReplyDeleteWoo hoo, congrats on the well-deserved win, JJ! And thanks so much for the tut. I'll have to try this out when I finally give in & buy the PTI letter dies.
ReplyDeleteVery clever. Thanks for showing how you did this...and congrats on your win!
ReplyDeleteum..yeah, easy peasy! (*wink*) congrats on the win. it is TOTALLY well deserved cuz u rock the die cuts crazy great ideas with 3 supplies and 50 different tapes like nobody's business!
ReplyDeleteI came here from I'm in Haven. She was inspired by your card and linked you. I think it's wonderful. I'm not a stamper but I'd like to try this technique.
ReplyDeleteWhoop whoop on your CAS-ual Fridays win!!!!
ReplyDeleteThank you so much for sharing this tutorial. So inspiring and beautiful.
ReplyDeleteThanks for these instructions. The technique is so pretty!
ReplyDeleteGorgeous and thanks so much for sharing your idea and the tutorial. I got to try it out :)
ReplyDeleteSuch a fantastic card and technique!
ReplyDeleteit took me a long time to think about how i would stamp exact same images twice and your tutorial makes it easy! thanks so much and i adore your beautiful card! thanks for sharing, JJ! =)
ReplyDeleteThanks for sharing such a great tutorial! Your card is absolutely amazing! I can't wait to try it out and will let you know if I'm successful....or not!
ReplyDeleteWow, this is amazing! I will surely give it a try myself. Thanks for sharing.
ReplyDeleteThanks for the tutorial~ This card is beautiful and beautifully crafted!
ReplyDeleteI love this. Thank you for such phenomenal inspiration!
ReplyDeleteSo very cool! Thanks for showing how you did it!
ReplyDeleteThis is stunning! Thanks for the tutorial!
ReplyDeleteThis is so amazing JJ and I cant wait to try it! Thanks for all the details on how to make this. Like I said I will give it a try ! You make the most fantastic cards!
ReplyDeleteI have to try this - thanks for the tutorial! Amazing card!
ReplyDeleteHey JJ....Kristie (Kreative Kristie) just posted a beautiful card that was inspired by your technique that you shared in this post. Your card is stunning, the colors are gorgeous and the tutorial is so well done!
ReplyDeleteThanks for sharing your talent and crafting cleverness with us :) Your work never ever fails to inspire me!
Happy crafting!
WOW, what a wonderful card!!!! ... and thanks sooo much for the tutorial, I will give it sure a try!
ReplyDeleteseriously wow!
ReplyDeletethank you for sharing the tutorial. It's a genius idea.
ReplyDeleteWowweeeeeee!! I love it!!
ReplyDeleteThe current MUSE Challenge referred me to your blog and your tutorial - thanks for sharing a great idea.
ReplyDeleteHi, I love this look, after having a break from card making for about 6 months ( because of moving house and everything going into storage!) I'm having trouble remembering which way to place letters down on card for die cutting (they keep coming out back to front on coloured card!)
ReplyDeleteI would love to try this card, but think I would end up with the letters on the wrong side of the stamped image, do you have any tips/hints on how to remember the right way? Thanks JJ great tutorial I'm going to give it a go over the weekend. Sending crafty hugs from the UK
WOW 2012 you did this post and are still getting people leaving comments Thank you so much for the pictorial it has and will really help me. Do you have a you tube video yet? It'd be fabulous to watch your tutorials.
ReplyDeleteThe other thing is "Papercrafter" magazine is doing a competition to be their Christmas card makerof the year. I 100% say you MUST enter this as your cards are unbelievable. (By the way I don't have any links to papercrafter at all) I'm looking forward to having a good nosey around your blog lol. Xxx AndreaH UK xxx