Thursday, October 29, 2015

Paper Smooches November Blog Hop

It's Pep Rally week and we are here today to share a sampling of the NEW Paper Smooches NOVEMBER release with you!  TWO new stamps and TEN new dies will be available to purchase on October 31st at 8:00pm pacific time. Once our release goes live, you will find our new products HERE.  

To add extra fun to our blog hop...we are offering up a prize!  The prize - a $25 gift code to choose what you like at the PS online store.

Here are the details:
  • FOUR winners will be chosen at RANDOM from any of the design team blogs and the PS Blog to win the $25 prize.
  • Just leave a comment on any of the design team blogs listed below or the PS blog for you chance to win!  (you do not need to comment on all blogs to qualify but it increases your changes)
  • Deadline: You have until midnight PT on Sunday, November 1st to leave a comment. 
  • Please check the Paper Smooches blog on Monday, November 2nd to see if you are one of the FOUR lucky winners.  
JJ Bolton (you are here)

To increase your chances of winning:
•   Tell us that you Facebooked about our blog hop
•   Tell us that you Tweeted about our hop
•   Tell us that you posted on your blog about our blog hop
(which means that you have up to three extra chances to win on each blog)

Now let's get to the new stuff:)  You can never have too many tags, so I'm happy that this month there's a new set of tags called Gift Tags 3.  This set includes one small tag (unstitched) and a slightly larger stitched tag.  And you know what?  The stitched tag matches the large tag from Gift Tags 2.  Yes, it's the little things that make me smile:)  So for my first card today, I've got a little tag-on-tag action with this little rustic card...


I stamped the large tag (from Gift Tags 2) with some pine boughs and berries from the Holly Jolly set to create a frame for the little stitched tag (from the new Gift Tags 3).  Isn't that little tag so sweet?


Here's another quick idea for these little tags in the Gift Tags 3 die set.  Cut plain white card stock tags and then cut them again with the smallest of the Snowflakes dies.   Then  die cut another set of tags with patterned paper or glitter paper.   Glue the two layers together and you have a set of totally custom tags.  I think this year instead of writing names on the tags, I'm going to use these tags and assign everyone a patterned paper:)  


Thanks for hopping with the Paper Smooches today!  The next stop on the hop is the fun and talented Kalyn Kepner!  Enjoy!

aloha,
jj

Trio of Shaker Tags with Avery Elle


The Avery Elle Naughty or Nice set is especially made for gift tags, so it seemed like a no-brainer to pair it with the Pocket Tag die.  Instead of using the tag pockets for a gift cards, I turned them into a mini shakers:)   Seriously, who doesn't love mini stuff?


The first step was to cut my tags (with a window added).  Then I added a bit of patterned paper to each tag for a background to the shaker.  I wanted to add one more element, but I needed petite images to match the scale of the mini shakers.  Luckily, the new Avery Elle release has a bunch of mini images, so I had just the perfect stamps to dress up my mini shakers.  


The shaker packets themselves were made with my Fuse.  Since the shape of this shaker is a simple square it was incredibly simple to put together.  Just fuse 3 sides, add your fillers, and then seal the last side.  


I can't wait to use these tags this year!


Thanks for stopping by today!    I hope you have a wonderful day! 

Mahalo,
jj

Saturday, October 24, 2015

Christmas Cards with Paper Smooches

I'm just stopping in with a couple Paper Smooches card!  (As you can see, I'm still plugging away at my holiday cards:)  This first card uses the Holly dies and one of the new sentiments from the set Holiday Cheer.  This card uses a template that I use often, white panel over a colorful partial background.  I used one of the Borders 1 dies to get that curve on the white panel.   


To color my holly leaves and berries, I used watercolor powders.  Whether it be watercolor powders, traditional watercolor (I prefer Peerless), or Distress Inks, I love the different shades you can achieve.  To me, it adds so much to the look of a card versus flat color of colored card stock.  Here's a closer look at that coloring...


My next card uses the beautiful Merry Christmas die.  I did a little stacked stamping but this time, I layered a white die cut over a black die cut.  Over the top of the card, I stamped and heat embossed a bunch of snowflakes (from the Cool Dudes set) and blended some Distress Ink over it.  


Thanks for stopping by today!  I hope you are having a great weekend!  

Mahalo and Aloha,
jj

Thursday, October 22, 2015

Minty Christmas Wreath with Avery Elle


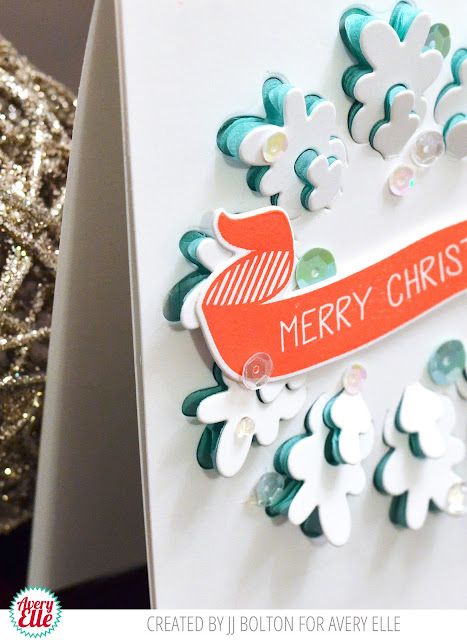
Hi guys! I'm still working on my holiday cards, and I've added one more this week.  This card uses Avery Elle's Pop Up Wreath die and the Fa La La stamp set and matching die to create a more modern, graphic wreath card.  The Pop Up Wreath die cuts a 3D design that you can lift up off the card.  Since the pieces of the wreath lift up, whatever you back your wreath with is visible.  In my case, I stacked several layers of mint-colored tissue paper behind my white card stock panel and then die cut the wreath.  The layers of cut tissue paper make a petal-like design.  


Here's a little closer look at the layers of tissue paper behind the top card stock layer.  (If you have honeycomb tissue paper, I bet that would work too)  On top of the wreath, I added the sentiment banner and a bunch of white, clear, and mint sequins and acrylic drops.  I can't wait to try this out with other colors of tissue paper!


Thanks for stopping by today!    I hope you have a wonderful day!

Mahalo,
jj

Tuesday, October 20, 2015

Essentials by Ellen Holiday II 2015 Blog Hop


Hello and welcome to the Holiday II Essentials by Ellen Release Hop! I’ll be showcasing some of the stamp sets and dies from the new release!

Are you ready to see some fun new stuff?  You may see some stamps that you're already familiar with in this first card.  The stamp set, Autumn Acorns, was actually released last year, but now there are matching DIES!   Who doesn't  love a matching die?  These dies made it so easy to create this Thanksgiving card!  I simply stamped and heat embossed a bunch of the outline acorns and leaves onto watercolor paper.  Then I die cut each piece and used my Peerless watercolor papers to paint each one.  


I arranged them around a circle that I painted in a faint sky blue (and splattered with some white paint) and attached the leaves with glue or foam tape.  Here's a  closer look at the wreath...


For my next card, I'm using the new stamp set, Holly Jolly, and the new matching dies for the previously released stamps, Christmas Scribbles!  The Holly Jolly set has sentiments in the most fabulous font. And I love that the sentiments are so large!  I decided to use a technique I like to call stacked stamping where you stamp the design once on the card front and then layer it with the die cuts of the same images.  This is fun to do with a design that has both images and words like this...


I love how the bold sentiment looks over the delicate "scribbled" stamps.  Here's a side view where you can really see how it's layered...


That's it for me today, but before I go, let's talk freebies:)  I get to give away an Essentials by Ellen stamp set!  The winner may chose ANY Essentials by Ellen brand stamp set (maximum value $15) currently in stock at Ellen Hutson.com  To enter my giveaway, please leave a comment on today’s post with a valid email address by October 27th!

Here's a quick look at the entire new release...

BTW, there's also a crazy good Grand Giveaway in the CLASSroom!  To enter, be sure to leave a comment there, also by October 27th, with a valid email address; winners will be announced at the CLASSroom on Friday, October 30th!

The next stop on the hop is the Heather Campbell!  (If you're going in reverse order, the next stop is Laurel Beard;)  Thanks so much to Ellen and Julie for asking me to participate in this blog hop:)  Happy hoppin’!

Mahalo and aloha,
jj

Thursday, October 15, 2015

Full Stockings with Avery Elle

I've added another Christmas card to my stash and this time I've used Avery Elle's Stockings (with a little penguin stowaway!  Using a little masking, I tucked the smallest penguin stamp in the Penguin Greeting set into one of the stockings.


The stockings themselves were paper pieced (jewel collection paper pad) and colored with matching Copics.  It's a bit hard to see, but there's a vellum panel between the stitched panel and the card base.  This gives the stitched panel a nice frame without a lot of visual clutter:)

Thanks for stopping by today!    I hope you have a wonderful day!

Mahalo,
jj

Sunday, October 11, 2015

Poppystamps Blog Blitz ~ Peace on Earth


I've got one more card on the Poppystamps blog for the new release Blog Blitz!  This time I'm using the Peace on Earth Channel die and some adorable little houses!  

Aloha!
jj

P.S. Did you know that during the Poppystamps Blog Blitz, there is a giveaway for each post?  Just leave a comment on the separate blog posts for a chance to win!  Could not be easier!

Saturday, October 10, 2015

Dreaming Monkeys with Paper Smooches

Just stopping in with a quick Paper Smooches card!  I'm using one of the new Paper Smooches stamp sets, Comforting Hugs, and the coordinating dies.  You'll see that I took a little liberty with the little monkey stamp;)  Instead of the monkey hugging a banana, I turned it into a moon using the no line coloring technique.  


I've only done the no line coloring a handful of times, but it's super easy.  You just stamp in the lightest color you can and them color in the image.  For this card, I stamped the image with a light yellow ink which works well for the moon and the monkey.  I used my Memento pen to go over the eyes, nose, and mouth.  After coloring, I die cut the image with the matching die.  


In the background, I blended some clouds and then added in some stars (from Space Cadet) and the sentiment (from A Little Lovin).  Can you see the moon now?

Thanks for stopping by today!  I hope you have a great weekend!  

Mahalo and Aloha,
jj

Friday, October 9, 2015

Poppystamps Blog Blitz ~ Cup of Cheer


Stop by the Poppystamps blog to check out the new release Blog Blitz!  This is a smaller release, but it's not just dies!  See those squirrels?  Well, there's a lot more adorable winter stamps in the release (with matching dies too)!

Aloha!
jj

P.S. During the Poppystamps Blog Blitz, there is a giveaway for each post!  All you have to do is leave a separate comment on each post for a chance to win.  Easy peasy!

Thursday, October 8, 2015

Let it Snow with Avery Elle

I'm chugging along with my holiday cards and I have one to share using the Avery Elle Oh What Fun stamp set and coordinating dies!  

This particular card has 3 different layers starting with the topmost layer that is a partial die cut.  The second layer is a A2-sized panel that I blended with lots of ink and reverse cut with the various snowflakes dies.  The base layer is the card base and that is stamped with the snowflakes inside each of the reverse cuts.  Is there a name for that technique?  I guess I would call it nested reverse cuts.  It's a fun change to die cutting the snowflakes and popping them up with foam tape:)


Thanks for stopping by today!    I hope you have a wonderful day!

Mahalo,
jj

Friday, October 2, 2015

All Tied Up with Avery Elle

Just stopping in with some quickie cards using Avery Elle's Beautiful Bow stamp set!  I always seem to need a gift at the last minute, so I try to keep a little stash of cards and gift cards for any occasion.  These two cards will be perfect to add to my stash, one for money and one for a gift card!  To create these cards, I stamped the bow on white card stock and then fussy cut them.  These bows are so lovely in person and really look 3D! 

Thanks for stopping by today!    

Mahalo,
jj

Thursday, October 1, 2015

Poppystamps Challenge #13: Trick or Treats

It's a new month and that means a new Poppystamps Challenge!  This month the theme is Trick or Treats (natch)!  For my card, I used the non-Halloweeny Cozy Kitties and Picket Fence with the very Halloweeny Decor Trick or Treat word dies to create a spooky night scene...


For the background, I used watercolor powder on watercolor paper.   To get this look, I started by brushing on just water with a wide brush.  Then I randomly sprayed the powders over the paper (just a tip, a little powder goes a long way).  I used blue, red, yellow, orange, and purple powders.  Then I sprinkled some drops of water over the panel and just let it sit.  I love the intensity of colors you can get with these powders!  The perfect stormy Halloween background!


After my watercolor panel was dry, I cut a "moon" just big enough for my sentiment to show through.  The sentiment was die cut into a scrap piece of paper, but I left the die cut intact. It's hard to see, but I blended just a tiny bit of yellow ink over the die cut just to bring out the letters more.  


The last step was to add the fence and my little black cat.  BTW, the watercolor panel and cat are attached with foam tape to give it more depth.  My boys have outgrown Halloween (boooo!!!), but I can't wait to send this card to my nieces:)

Hope you join in the challenge! 

Aloha!